Thursday, March 08, 2007

The 4 NM Hold

Holding patterns based on distance rather than timed legs are becoming increasingly common, particularly for GPS approaches. Whether it is a turn around holding in lieu of a procedure turn or holding at the missed approach waypoint, 4 nm legs are becoming quite common.


The traditional method for making a teardrop entry into a hold is to turn approximately 30° away from the outbound heading, making the turn so as to stay inside the protected area of the hold, and fly for approximately one minute before turning back to intercept the inbound course. (See "A Eureka Moment".) This time honored technique works quite well for holds based on one-minute inbound legs, but it doesn’t work so well for the 4 nm holds. If you make the conventional turn for a teardrop entry and fly until you are 4 nm away from the holding waypoint, you might be far enough away from the inbound course to make intercepting it problematic.

So consider a variation on the teardrop entry. In this method, after crossing the holding waypoint, turn to the heading for the teardrop entry and fly for one minute. At the end of one minute, turn to the outbound heading and parallel the inbound course until 4 nm from the holding fix. Then turn to intercept the inbound course.

Below is shown the track of a turn around holding for a procedure turn at NOVSY, from the GPS-12/OWA. The turn around holding was flown by one of the instructors at Sim Flite Minnesota, who wanted to do some sim work to keep her instrument skills sharp.


I would say from the track, that her skills are quite good. Try this technique for a hold with 4 nm legs. It works quite well.

Sunday, March 04, 2007

Little Things That Can Ruin a Flight

In Right Airport, Wrong Approach, I described a short instrument training flight from Anoka (KANE) to New Richmond (KRNH) to Osceola (KOEO) and back to Anoka, with an approach planned at each airport. The article describes how to get the Garmin 430 to display the approaches for the next airport in the route (KRNH) rather than the final airport (KANE).

Once that was taken care of, we proceeded to New Richmond, where my student did the GPS approach. The plan was to then go to Osceola and do the GPS approach there. New Richmond and Osceola are relatively close together, which does not leave the pilot much time to troubleshoot any problem that might occur.

At New Richmond, once again we employ the MENU trick in order to bring up the approaches for Osceola. There are only two, a traditional NDB approach and a GPS approach, both for runway 28. But now there is a nasty little surprise waiting for the unwary. The 430 database only shows the traditional NDB approach.


But your trusty Jepp or NOS instrument approaches distinctly show two approaches for Osceola. Time is short, and you quickly reload the approaches for Osceola. But the 430 stubbornly insists there is only the one approach. The MSP approach controller is getting a little more insistent – what do you want to do, fly the full approach or take vectors. Perhaps the easiest way to handle this is to select the full approach, which makes the NDB at OEO a waypoint.


With the OEO NDB as the active waypoint, the GPS can then be put into OBS mode and the HSI or OBS course selector set for the final approach course. Then the approach can be flown, using the 430 to make a virtual VOR out of the NDB.


Things to double check – OEO is the active waypoint, the VOR display or HSI is being driven by the GPS (CDI is set to GPS) and the unit is in OBS mode. You can now fly an intercept course, and life is good again. MSP approach is happy again too, which is always a good thing.

But why was there no GPS approach into Osceola? You have an approach plate for it, but it was not in the GPS database. The answer is one of those little things that can jump up and bite you at the most inappropriate of times – Notams.


!FDC 6/9414 OEO FI/T L O SIMENSTAD MUNI, OSCEOLA, WI.
GPS RWY 28, ORIG...
PROCEDURE NA.

Yep, the GPS-28 approach into Osceola is not authorized. In questioning Jeppesen about the mismatch between the printed approach procedures and the GPS database, it appears that it is much easier to remove it from the database than to remove it from the printing process. So in order to comply with the FDC Notam, the approach was removed from the database. The object lesson here is that it is all too easy to become complacent, particularly when dealing with airports and approaches that are very familiar.

Our last planned approach was the ILS-27 back into Anoka (KANE). The wind was out of the northwest, so a straight-in approach was planned. But what if you had planned on doing the VOR-DME-27 approach into Anoka?


Once again, those pesky Notams could jump up and bite the unwary.

FDC 6/1513 ANE FI/T ANOKA COUNTY-BLAINE ARPT (JANES FIELD),
MINNEAPOLIS, MN.
VOR/DME RWY 27, AMDT 4A...
S-27 MINIMA NA.

Because of the FDC Notam, you can only descend to the circling minimum of 1400 feet. Those extra 60 feet, if you weren’t aware of them, could certainly result in a pink slip on an instrument checkride.

The bottom line is to check those Notams. Use the Find function in Notepad or whatever you use to search for everything relevant to your flight. Don’t let complacency ruin a perfectly nice flight.

Wednesday, February 28, 2007

Right Airport, Wrong Approach

I went on a short training flight today with an instrument student in his C182, equipped with both a Garmin 430 and an MX20. My plan was to do a short flight to two nearby airports, New Richmond (KRNH) and Osceola (KOEO) and then return to Anoka (KANE), doing an approach at each airport. So he created a flight plan for our route. Entered into FPL0, it showed New Richmond as our active waypoint, which was precisely what we wanted.


When he selected PROC to load the GPS approach into KRNH however, it did not display the approaches for New Richmond, in spite of New Richmond being the active waypoint. The approaches for Anoka (KANE) were displayed, and this was not what was wanted.


So how to do you get the approaches for New Richmond, which is where we’re headed? As you might suspect, there is a trick to doing it. While in the PROC page shown in Figure 2 and with the cursor activated, press MENU, and then press MENU a second time. The first time you press MENU, the named approaches box will disappear and you will be left with the box showing the highlighted approach in green, as shown in Figure 3.


When you press MENU a second time, it will bring up a dialog box that allows you to change which airport you want, as shown below.


When you turn on the cursor and select “Select Next FPL Apt?”, magically the approaches for KRNH appear. Now you can select the approach you want at New Richmond, and life is good again.


Just make sure, however, that the approach you planned on doing is really available. More on that next time, subtitle “How Little Things Can Really Trip You Up.”

Thursday, February 15, 2007

PLUGG or PLUGS?

I was working with another CFI this week who wanted more practice on using the Garmin 430. The sim provides an ideal venue for doing this, and I had been taking full advantage of it, putting him into all sorts of scenarios involving the 430. One completely unplanned teaching experience occurred however, and it is well worth sharing with readers.

He had been working through a series of exercises using the FPL0 page. He was on a route from KANE (north of Minneapolis) to KSTC, about 50 miles northwest of KANE. There is an intersection between the two airports, named PLUGS intersection. I asked the student to modify his route in FPL0, so that he would first go to PLUGS and then to KSTC. So he went to the FPL0 page, turned on the cursor, scrolled down to where he wanted to insert the PLUGS waypoint and started the necessary knob twirling to insert the waypoint. By the time he got to the “U” position, the 430 had enough information to try an auto-complete of the waypoint. So it completed the waypoint as shown below.


He then proceeded to hit ENT and PLUGG was inserted into FPL0. In this case, however, the 430 had led him astray. The intersection he wanted to insert was PLUGS. However there is a PLUGG intersection, but it happens to be in the southeast part of the country. A quick “sanity check” would have prevented the error. The lesson here is to always check the waypoint you are inserting is really the one you want. The GPS will try to help you out by auto-completing waypoints, but you must always check what it is helpfully offering to you.

Thursday, February 08, 2007

A Eureka Moment

Every once in a while in this instructing business, you have what can only be described as a “eureka” moment. An insight occurs to you that is so simple and so obvious, you just have to sit back and ask yourself “Why didn’t I think of this 15 years ago?”

Such a moment occurred a week or two ago, when I was working another instructor in the sim. He is prepping for a possible interview and had specifically asked me to concentrate on holding. So I was giving him multiple holding clearances that would mandate all possible types of entries. I have written before about how to create holding clearances – at Holding Clearances

That all worked fine and well, but I needed to give the student some way of intuitively knowing which way to turn on a teardrop entry without resorting to drawing the hold. In thinking about it, I realized that when you approach a hold for a teardrop entry, you are essentially looking at the mirror image of the hold, so to speak If it is a teardrop entry for a right-hand hold, you need to turn to your left. If it is for a left-hand hold, then you need to turn to your right. So why not teach your student to use their hand to determine which way to turn? For example, you are approaching a right-hand hold, as shown in the following graphic.


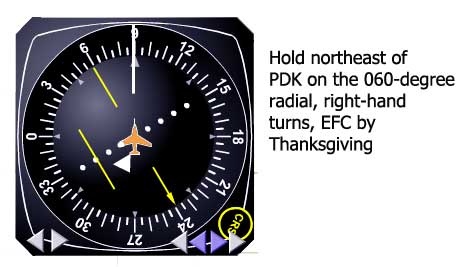
You are southwest of the VOR, and your holding clearance is to hold northeast of the VOR on the 080° radial right-hand turns. You know that your outbound heading is going to be 080 degrees, but sometimes it is difficult to see which way to turn 30° off of the outbound course without drawing it out. But suddenly I realized you can use your hand to easily figure it out. Right-hand hold – so hold out your right hand, palm down. You need to turn 30°off of the outbound course in the direction of your thumb. Here your outbound course is 080°. So turn 30° in the direction of your thumb away from the outbound course, or 050°

If it’s a left-hand hold, the same thing works, only you hold out your left hand. You are northwest of the VOR and your holding clearance is:

Hold southeast of the VOR on the 140° radial left-hand turns

So hold out your left hand, palm down, and turn 30° off of your outbound course, in the direction of your thumb. So you would turn to 170° for your initial teardrop entry.

I’ve seen a lot of different tips and aids for helping instrument pilots determine which way to turn, but I think this is about the easiest one by far. As I said, every once in a while these “eureka” moments occur.

Friday, January 19, 2007

Teaching the Chandelle -- It works in the sim too


The chandelle is one of the maneuvers in the single-engine commercial flight test. It is a maximum performance 180°climbing turn and was developed during World War I by French pilots. They would fly to enemy ground troops and toss their bombs out of the cockpit, and then perform the chandelle in an effort to avoid ground fire.

The maneuver is divided into two parts. During the first half of the maneuver, through 90° of heading change, the bank angle is held constant, and the pitch is slowly increasing. During the second half of the turn, the pitch is held constant and the bank angle is slowly rolled out. The graphic attempts to show the changes in the maneuver, where the gradually darkening magenta represents the increasing pitch, and then held constant during the second half, and the same for the changing bank angle, represented in blue. It is steady throughout the first half and decreases throughout the second half of the maneuver.

A road that is parallel to the wind serves as a good visual reference for teaching the chandelle. Fly towards the road at normal speed. When you cross the road, quickly turn into the wind, rolling to 30° of bank angle. Then simultaneously add full power and start to pitch up. At the 90° point in the maneuver you will be parallel with the road. You should still have 30° of bank angle and to have reached the maximum pitch attitude. During the second half of the maneuver, hold the pitch attitude constant while slowly rolling out bank angle. When you cross the road again, now in the opposite direction, you should have rolled to wings level and be just above a stall. Complete the maneuver by slowly lowering the pitch attitude to regain your airspeed. Lots of right rudder is needed during the second half of the maneuver, and at the 180° point, all of those left turning tendencies will be in full force.

In teaching the chandelle, I see two very common errors. The most common is uneven roll out of bank angle. The tendency is to keep most of the bank angle in until you are through about 170° of turn and then roll it out all at once. The second most common error is not maintaining the pitch attitude. It takes increasing back pressure to maintain it, and the tendency is to let it flatten out. How much pitch attitude is needed? That varies from plane to plane, and you just have to experiment to find out how much is needed to give you the desired airspeed at the completion of 180° of turn.

Because uneven bank angle roll out is such a common error, I teach the chandelle in two parts. The first part is simply learning to manage the bank angle – don’t do any of the pitch and power changes. Start on a cardinal heading and quickly roll into a 30° bank angle. When you have completed 90° of heading change, start slowly and smoothly rolling out the bank angle. As a guide, at 120° of heading change, you should have about 20° of bank angle. At 150° of heading change the bank angle should be down to about 10°. Practice this until you can handle the roll-out smoothly. The last 10° of roll out feel like you will never get the plane around to the desired heading, but it will happen – just very slowly. When you have the roll-out under control, you can now add the pitch and power. Just be sure when you do the complete chandelle that you make the quick roll to 30° of bank angle first, and then add power and start the pitch change.

UPDATE:

Today for the first time I actually taught the chandelle in the sim. It would not have occurred to me to do so in the sim, but I had a request from a CFI student to go over them in the sim. First I watched him do the maneuver, with it set to VFR conditions and configured as a C172. I saw the same mistakes that I see in a plane. So we did the two-part learning process. We worked strictly on bank angle management until he had that down pretty well. Then we added the pitch and power. We only spent 0.8 hour in the sim, but at the end of that short session, he was doing much better. The airplane would never have been that efficient. Now on Sunday we’re going to tackle Lazy 8’s in the sim. This should be fun!

Thursday, January 04, 2007

The Sim in Action

Over the Christmas holidays, one of my friends took a video of the sim in operation and made a 30-second clip that I put up on the website. I have been amazed at the response it has generated. Just that short clip is so much more informative about the sim than still pictures. You can see the clip at

http://www.simfliteminnesota.com/clients.html

The clip shows the sim configured as a Bonanza, with one of my friends flying the ILS-10R into KFCM (Flying Cloud airport). I’ve had several people complain that the clip was too short. So longer clips are in the future.

Thursday, December 21, 2006

Logbook Entries

I have on many occasions had discussions with flight instructors on issues concerning logging of time. I would like to go over a few of these issues. Some of them are misconceptions, while others are simply confusion about how a particular logbook entry should be made. I should also add that I claim no great expertise in these matters, but I did serve as chief flight instructor of a flight school for a number of years, and researched these questions as they arose. In many cases I relied heavily on the Part 61 FAQ file created by John Lynch. For a long time this file was available on the FAA’s website. It was recently removed from the site, but a number of us still have copies of the file squirreled away for reference.

I emphasize that in no way do I consider myself an expert on logbook entries, but I do get a lot of questions about these issues. Trying to research and find the right answers has led to the following recommendations I give to pilots and instructors.

References

  • John D. Lynch Part 61 FAQ file
  • FARs Explained, by Kent Jackson and Joseph Brennan
  • AOPA Flight Training, columns by John and Kathy Yodice

Logging Landings for Currency

One of the most common misconceptions is that because an instructor may log flight time when giving dual instruction, by extension that instructor may also log the student’s landings as their own landings in order to satisfy currency requirements. In a nutshell – no way. John Lynch is very clear about this. An instructor may not maintain/attain the FAR 61.57 recent experience for takeoffs and landings while monitoring and critiquing takeoffs and landings performed by another pilot/student. Jackson and Brennan also concur on this – a CFI cannot log student landings to meet the FAR 61.57 recent experience criteria.

Logging IMC Time

Only the pilot can determine if the aircraft is in actual instrument conditions. But a quick and easy answer, according to John Lynch, is that if the weather is below the VFR minimums listed in FAR 91.155 and the pilot is flying solely by reference to instruments, the time may be logged as instrument flight under actual instrument conditions.

When flying solely by reference to instruments in VMC conditions, such as a dark night over a landscape with few visible lights or over an overcast with no visible horizon, it should be logged as simulated instrument conditions. However this brings up the interesting question of whether a safety pilot must be in the other seat when flying solely by reference to instruments in VMC conditions such as listed above. John Lynch is not completely clear on this.

An appropriately rated flight instructor (CFII) may log as actual instrument time the time spent giving flight instruction in IMC conditions.

A pilot working on an instrument rating may log the time spent in actual IMC conditions when receiving training from a CFII as PIC if the pilot is rated for the airplane. Note, there is a difference between logging time as PIC and serving as PIC on the flight. The person who is sole manipulator of the controls may log the time as PIC. However that is not the same as serving as PIC on the flight. The later, the CFII in this case, is serving as PIC on the flight and as such has full responsibility for the safety and legality of the flight.

Logging Approaches

A CFII may log approaches that a student flies when those approaches are conducted in actual instrument flight conditions. John Lynch is slightly unclear on this, but he seems to imply that in order to log an approach in actual instrument conditions, it should be flown to either DH or MDA. However he doesn’t say that the entire approach, down to DH or MDA, must be conducted in IMC. But he is very clear that to fly to the FAF and then break it off does not qualify as an approach flown in actual instrument conditions. Jackson and Brennan concur on this, but further specify that it may be necessary to abandon the approach for safety reasons.

Logging Time in an FTD

Instruction received in an authorized FTD (Flight Training Device) such as Frasca or an Elite RC1 ATD from a CFII may be logged as dual received and FTD (or simulator) time. It does not count towards flight time. The logbook entry must contain the type and identification of the device and its location. Instructors should make a corroborative entry in their logbook, for FTD time and dual instruction given. The 8710 form contains space for FTD time under both the instrument column and the dual received column.

If a FTD is approved for 2.5 hours toward the Private Pilot License, the device may not be used to meet the requirements for three hours of hood time. This time specifically must be accomplished in an airplane. FAR 61.109(a) specifies 12 hours of instruction that must be conducted in an airplane – 3 hours night, 3 hours cross-country, 3 hours hood work, and 3 hours in preparation for the practical test. However the 2.5 hours in an FTD may be used to meet the remaining non-specified (minimum) 8 hours of dual instruction.

Logging Night Flight

According to the John Lynch, logging of night flight should be made in accordance with Part 1 definitions, which is from the end of evening civil twilight to the start of morning civil twilight. This is approximately from ½ hour after sunset to ½ hour before sunrise. Note, this definition does not serve for the purpose of meeting night currency. That is still from one hour after sunset until one hour before sunrise. So basically FAA has three definitions of night.

  • Sunset to sunrise – aircraft position lights must be on
  • ½ hour after sunset to ½ hour before sunrise – may be logged as night flight
  • 1 hour after sunset to 1 hour before sunrise – may be used for landings to attain/maintain currency to carry passengers at night.

Monday, October 30, 2006

Creating holding clearances


So there you are, trucking along in your trusty bug smasher (or trusty sim), tracking inbound on the 360° radial, when without warning your instructor sadistically says, “Devise a holding clearance from your present position that will require a parallel entry for a left-hand holding pattern.”

Many instrument students do very well figuring out holding entries in an intuitive fashion. However this approach tends to break down when you are on the dispensing end of a holding clearance rather than the receiving end. Although at first glance it may seem a bit daunting, once you have your secret decoding ring, it’s remarkably easy to do.

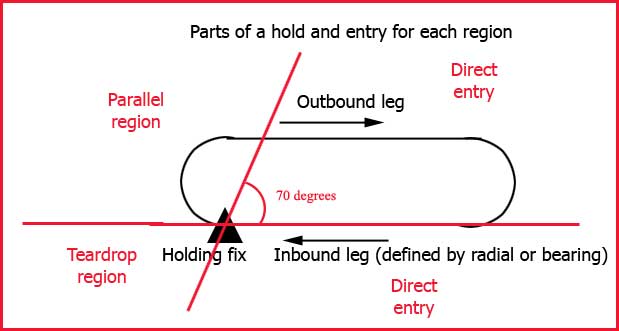
The secret decoding ring system works when the airplane is traveling to a VOR (or GPS waypoint). Let’s take the situation shown above, traveling towards the VOR. Remember when you were studying for your instrument rating and your instructor drew out the classic diagram for determining holding entries?


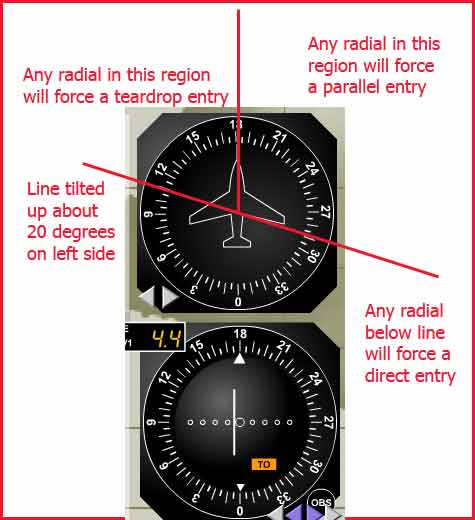
The trick in creating holding clearances is to use this same diagram and overlay it on the DG or HSI. Let’s say you are tracking inbound on the 360° radial as shown in the first figure, and you want to create a holding clearance that will force a teardrop entry for a standard (meaning right-hand) holding pattern. To do this, take the pattern formed by the red lines in the above figure and superimpose it on the DG or HSI, with the inbound leg being the radial on which you are tracking inbound.


Because it is a right-hand holding pattern, tilt the horizontal line up about 20° or so on the right-hand side of the DG or HSI. The radial on which you are tracking inbound forms the vertical line. Taken together, these two lines delineate the three regions for hold entries. The small pie-shaped section is for teardrop entries – any radial selected in this region will call for a teardrop entry. (Hint – remember “Tiny Tears”) The larger pie-shaped segment defines the parallel entry region. Any radial in this region will call for a parallel entry. Everything below the tilted line calls for a direct entry. So in this case, if you want to create a holding clearance that will force a teardrop entry for a right-hand pattern, any radial between about 190°and 240° will work very nicely. So the holding clearance could be

Hold southwest of VOR on the 210° radial right-hand turns EFC


If you want to create a holding clearance for a left-hand pattern, just tilt the left-side of the horizontal line up rather than the right side. Let’s say you want to create a holding clearance that will call for a parallel entry for a left-hand holding pattern. Again, superimpose the two lines on the DG or HSI, but this time since a left-hand pattern has been specified, tilt the left side of the line up about 20° or so, as shown below.


The 240° radial lies right in the middle of the parallel entry region. So a holding clearance could be:

Hold southwest of VOR on the 240° radial left-hand turns EFC

Creating hold clearances for your student is really a very simple matter once you know this little trick. Try out a few for yourself.

Direct entry for either left-hand or right-hand hold could be:

Hold northeast of VOR on the 030° radial EFC

Teardrop entry for left-hand hold could be:

Hold southeast of VOR on 150° radial left-hand turns EFC

Parallel entry for left-hand hold could be:

Hold southwest of VOR on 210° radial left-hand turns EFC


Parallel entry for right-hand hold could be:

Hold east of VOR on 090° radial right-hand turns EFC


And there you have it – the secret decoding ring for creating holding clearances for your student. And yes, it works equally well for teaching holding entries to your student. The only caveat is that you must be tracking towards the waypoint in order for this method to work.

Sunday, October 22, 2006

Avionics Troubleshooting

This avionics troubleshooting guide comes from R.C. Avionics. It is a great compilation of tips and guidance in troubleshooting avionics problems. R.C. Avionics suggests keeping a copy of this guide in the airplane.

General Troubleshooting
• Check the aircraft breaker or fuses. Reset only once.
• Is the electrical system properly charging?
• Could water have leaked onto the avionics?
• Could a connector be loose or wire broken from recent maintenance?
• Do you hear alternator or mag noise?
• Are any antennas missing, corroded, dirty, broken, oil coated, or delaminated?
• Is the problem intermittent?
• Could heat, cold, altitude or time be a factor?

Loran
• Has the correct triad been selected?
• Is manual triad mode selected?
• Verify the correct waypoint.
• Is there a NORAM of any outages?
• Are the signal and SNR levels adequate?
• Are you in a fringe coverage area?
• Is precipitation static a factor?
• Does it have the latest hardware/software updates?
• Check present position or nearest airport.
• Are there any warning or error messages?
• Is interference also affecting the ADF?
• Are you near a thunderstorm?
• Is the NAV selected to an ILS frequency locking out course deviation?

Transponder
• Is ATC receiving both Mode-A (squawk code) and Mode-C (altitude)?
• Has the problem occurred with more than one ATC facility?
• Is Mode-C inoperative or just reporting the wrong altitude?
• Does the reply light illuminate in radar coverage?
• Is the reply light dimmer turned down?
• Is it in the correct mode (stand-by/on/altitude)?
• Does it recycle (power off, then on, then wait 30 seconds)?
• Does turning off the DME resolve the problem?

Com/Audio Panel/Intercom
• Is the correct frequency active (not stand-by)?
• Are the audio switches set correctly?
• Is the auto mode being used?
• Is the same radio selected for transmit and receive?
• Is the volume turned down?
• Is a mic key stuck?
• Are both the headphone and speaker working?
• Does it both receive and transmit?
• Do you hear your voice in the headphone during transmit (sidetone)?
• Did ATC say they heard carrier only without voice?
• Is there background noise when in test mode (squelch off)?
• Try a different headset or microphone.
• Try emergency or isolation modes.
• Are the plugs or jacks dirty, corroded or loose?
• Do all crew and passenger headset locations have the same problem?
• Does another com act the same way?
• Is the oxygen mic switch in the proper position?

Autopilot
• Review operating procedures.
• Does it pass self-test on the ground?
• Does the auto trim work?
• Does the manual electric trim work?
• Does it engage?
• Can you overpower it on the ground?
• Do the controls lock when engaged?
• Could the cables be loose from maintenance?
• Is the aircraft out of trim?
• Is the horizon gyro precessing?
• Is the gyro vacuum within limits?
• Does it hold the wings level?
• Does it hold heading?
• Does it lose altitude in a turn?
• Does it porpoise?
• Does it respond in NAV mode?
• How does it respond on an ILS?

Radar
• Does it paint rain and ground clutter?
• Is the gain turned down?
• Is the brightness turned down?
• Does it test?
• Does it display wheel spokes?
• Does the tilt work?
• Are the images smeared?
• Does it lose targets within 40 miles?
• Is the radome damaged or delaminating or leaking?
• Is stabilization working?

DME
• Does it receive an ident code? (Listen for 60 seconds.)
• Is the remote channeling switch set?
• Is the display dimmed?
• Does the GS and TTS function? (Flying directly to/from but not over station.)
• Is the problem present on other frequencies?
• Does it test?
• Is there a NOTAM of any outages?

ADF
• Is it on the correct frequency?
• Is the unit in ADF mode?
• Does it point to the station?
• Does the needle move in test?
• Does the unit receive in ANT mode?
• Does the unit receive in ADF mode?
• Do all three frequency bands work – (200-399, 400-799, 800-1699)?
• Do you hear alternator or mag noise?
• Is the reception better on the ground with the engine(s) off?
• Are other radios interfering with the ADF?
• Are there thunderstorms in the area?
• Is there a NOTAM of any outages?

Lightning Detection
• Does it pass self test?
• Does it display aircraft electrical noise?
• Is heading orientation functioning?
• In a turn, are the dots all in the same relative direction?
• Is the brightness turned down?

GPS
• Verify the correct waypoint.
• Check present position or nearest airport.
• Are at least three satellites being tracked (VFR) or four satellites (IFR)?
• Is the satellite geometry poor?
• Are the satellite signal levels adequate?
• Has the unit been inactive for a few months?
• Is the hold or OBS mode selected?
• Is the NAV selected to an ILS frequency locking out course indication?
• Is there a NOTAM of any outages?
• Are there any warning or error messages?
• Does it have the latest hardware/software updates?

VOR/ILS
• Is the correct frequency active (not stand-by)?
• Does it receive the ident code?
• Do the needles or flags move at all?
• Can you select a reciprocal OBS course?
• Does the To/From indicator work?
• How many degrees off is the VOR?
• Does the NAV test (self or VOT)?
• Does it have 20° course width peg to peg?
• Do both NAV radios have the same problem?
• Does the localizer work but not the VOR?
• Are you close or far from the station?
• Does a change in engine rpm have an effect?
• Is the RNAV or PAR mode active?
• Is the Loran/GPS switched to the indicator?
• Is there a NOTAM of any outages?
• Is the problem present on different frequencies?
• Does VOR station position relative to the aircraft have an effect?

Marker Beacon
• Do the lamps illuminate over markers?
• Do lamps test?
• Are the lamps dimmed?
• Is problem resolved when high sensitivity is selected?
• Is the audio turned down or not selected?
• Are lights seen but tones not heard?
• Are the correct tones heard?

Monday, October 16, 2006

Let There Be Light


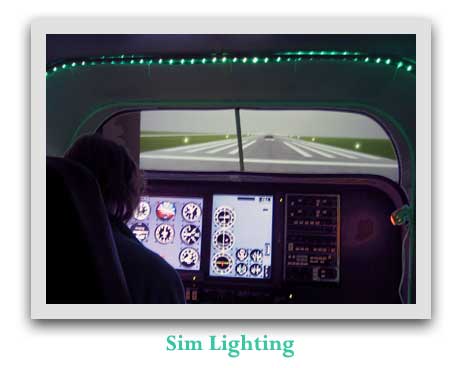
When it comes to lighting in the sim, it has been something of a Catch 22 situation. To really see the great graphics, the room needs to be fairly dark. However then reading an approach plate becomes nigh impossible. Some small lights on the sides have at least made approach plates visible, but the radio stack was still pretty much of a black hole.

One of the sim customers came up with the idea of utilizing rope lights to create sufficient ambient light to see the radio stack while still allowing the room to be dark enough to see a runway materializing out of the gloom. He brought in a piece of rope lighting that was long enough to go from one side of the cockpit enclosure, across the top, and down the other side. The lights are actually behind the pilot’s head, so they aren’t in the field of vision. He selected light green for the color, which happens to be a great color in a cockpit. The effect is great, and the visibility for the pilot is very good.

It was a great idea on his part, and I think it will really solve the problem of providing enough soft ambient light to see the radio stack and controls but not interfering with the graphics.

Sunday, October 08, 2006

Windows Strikes Again

Recently I flew with a longtime friend who wanted to do some approaches. He explained beforehand that he had been flying strictly VFR for several months and thought he might be a bit rusty. The flight confirmed the rust prediction. He wanted to make a trip to Rapid City, SD (KRAP), so decided to schedule a sim session.

He normally flies a Piper Dakota, a fixed-gear Cherokee with a 235 hp engine. I configured the sim for a fixed-gear C182, figuring this would be close in speeds and performance to the Dakota.

About 45 minutes into the sim session, strange things started happening. First symptom was a loss of power, followed by loss of vacuum, then electrical failure. I was baffled. I hadn’t specified any systems failures, and a check of the malfunctions page confirmed that everything was supposed to be working.

With apologies, I reconfigured the sim as a trusty C172, the most commonly used model in the sim. Again, about 20 minutes or so into the flight, the same set of symptoms occurred.

I was both perplexed and unhappy. This had been my friend’s first introduction to the sim, and it certainly did not live up to his expectations. I called Elite support and left a message detailing the problem.

Elite support called back in about an hour. Yes, they had seen the problem and knew what it was. It was not an Elite software bug, nor was it a hardware bug. Instead, it was a Windows problem.

Wonderful Windows XP had struck again. In its “father knows best” mode, Windows decided to put the USB hub into energy saving mode. I was directed to the proper spot to turn off the option to put the USB hub into energy saving mode.

So far it hasn’t happened again. Once again however I find that I really resent the hubris on the part of Windows to think that it knows what is best for my system.

Sunday, October 01, 2006

A Piece of the Magic


Periodically I check out fellow instructors in J’s plane. J. has a very nice fixed-gear Cessna Cardinal (C177). However a checkout in this plane reduces most instructors to feeling like a student pilot again. Remember how you felt the first time you tried to taxi an airplane? Well, you will relive that feeling on your first attempt to taxi J’s plane.

J. is one of the coolest guys I know. When he was 16 years old he fell off of a ladder and broke his neck. It left him in a wheelchair. But J. didn’t give up on life or his desire to learn how to fly. J. bought the Cardinal and had the left side fitted with hand controls. Although the right side has conventional controls, I have all instructors who fly with J. do the checkout in the left side, so they will understand how to fly a plane with hand controls and what J. is dealing with.

The hand controls hook on to the brake and rudder pedals with j-hooks. A bar comes up and rests on the pilot’s right leg. This bar has a knob to use when moving it. Move it to the 9 o’clock position and you have engaged left rudder. Moving it to the 3 o’clock position engages the right rudder. 12 o’clock engages both brakes, while 10:30 and 1:30 engage left brake + left rudder and right brake + right rudder respectively. You must learn to taxi and fly the plane with both feet flat on the floor. In the air it flies pretty conventionally, but taxi, take-off, and landings are very challenging.

When the first version of the hand control was installed in the Cardinal, it was not as functional as the current version, and I had an extremely difficult time learning to use it. I was the Anoka version of “Entertainment Today” for the tower. I will never (ever) forget the day I was going to taxi out to runway 27. I had to taxi north past the tower and then hang a hard right to go out to runway 27. When I started trying to make the turn to the right, I could not get the airplane to go all the way around to the desired direction. Unable to turn right, I decided I would do a 270-degree turn to the left. About a quarter of the way around, I came to a dead stop, unable to get the hand control to keep the airplane turning left. Completely frustrated, I decided to drop the hand control bar down on the floor and resort to using the rudders. However the j-hooks were still firmly attached to the rudder pedals and the bar was hitting the seat pedestals, preventing full use of the rudders. As a result I was unable to go in either direction. I was finally forced to shut the plane down and ask ground control if they would have a tug sent out for me. By this time the tower was in stitches, and I was completely embarrassed. I was definitely the talk of the airport for a couple of days.

One day when I was talking to J., I asked him why he was so determined to learn how to fly. He told me how he had always hung around airports, listening to the pilots talk. And then he said something that almost brought tears to my eyes. He said listening to the pilots talk, “flying was like magic, and I just wanted a piece of the magic for myself.” Go for it, J. – you’re an inspiration to everyone who knows you.

Friday, September 29, 2006

Snowbird Practice

R. is a sim student who is working on getting his instrument proficiency back. He owns a lovely Piper Lance, and we met a few weeks ago when I did his flight review. Although he is instrument rated, he has not used it very much. I mentioned that he might be interested in Wings of Mercy Minnesota, a volunteer organization of pilots similar to Angel Flight. R. was interested and decided the sim was the perfect tool for regaining his instrument proficiency.

He is flying the sim configured as a Bonanza. We started with the basics, and it quickly became apparent that his initial training was good, although there was a bit of rust to be removed. He progressed through the basics, including partial panel work. The sim, incidentally, does very nice mag compass turns, which is quite satisfying after working in the Frasca. The only time the Frasca could do a mag compass turn correctly was if you were turning to a heading of either due east or due west. After going through the basics, all types of holding, and DME arcs, today it was time to start approaches.

R. and his wife are “snowbirds”, leaving Minnesota in mid-October for their home in Florida. Since we were starting on approaches today, I suggested he bring in plates for the airports close to their Florida home. So he brought in the GPS-4 approach for Winter Haven (KGIF), the GPS-27R approach for Bartow KBOW), and the ILS-5 for Lakeland (KLAL). Since the sim has a Garmin 430, as does his Lance, it was perfect.

It was a snap to load the USSE database, which included Florida. I positioned the plane at Lakeland, and he soon ready for takeoff. First came the GPS-4 into Winter Haven. He was vectored to go directly to the intermediate waypoint BEZDU. We did that approach twice, and then I vectored him for the GPS-27R at Bartow. Finally we finished up with the ILS-5 at Lakeland. The first ILS was vectors, and the second one included one turn around holding, which serves as the PT.

R. did a good job. But the thing that stands out in my mind was the ease of switching the Elite AATD from Minnesota to Florida. This was somewhat of a messy procedure in the Frasca. It is a far superior procedure in the Elite. And best of all, when R. and his wife depart for Florida in a couple of weeks, he will be fresh on the approaches at all three airports.

Sunday, September 24, 2006

Using an HSI

To many pilots, an HSI ranks high on the list of essential flight instruments, while others find it mystifying. So let’s try to demystify the HSI. HSI, as most of you know, stands for Horizontal Situation Indicator. However that definition by itself doesn’t offer much of a clue as to why pilots love it. So let’s examine an imaginary evolutionary history of the HSI.

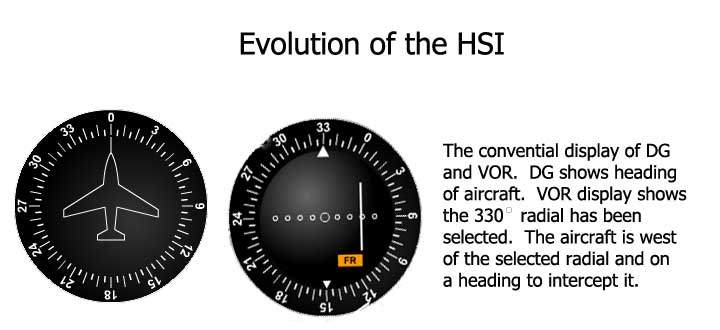
In the beginning there was the trusty DG (or heading indicator, if you prefer) and the VOR display. They were two separate and distinct instruments, with two separate and distinct functions.


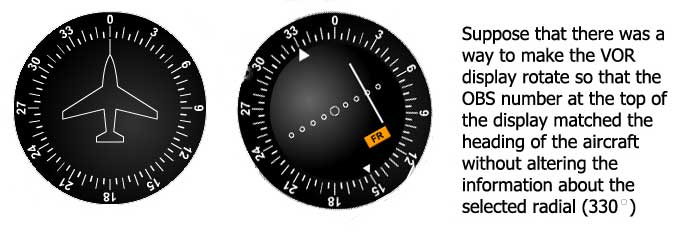
Most of us during our training learned to use the OBS knob on the VOR display to select our desired course, in this example the 330° radial. Then we would determine an appropriate intercept heading. The CDI shows the aircraft is west of the radial, so we fly towards the CDI. A heading of due north, as shown on our trusty DG, will work nicely. Sooner or later the CDI will start moving towards the center of the VOR display, at which point we guess as to how quickly to turn to a heading of 330°.

This all works very nicely, and it’s how the majority of us were trained. But we have to look at two different instruments and figure out if everything will work. Will we intercept that 330° radial? But suppose we could somehow magically rotate the VOR display so that it matched the aircraft heading.


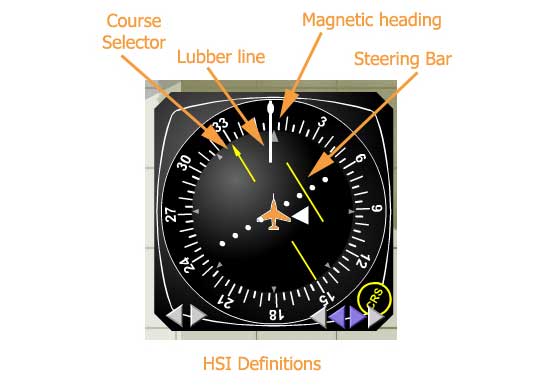
This improves things, but you still have to look at two instruments. But now suppose you could merge those two instruments, so that the VOR display was superimposed on the DG. This is exactly what the HSI does – it merges the two instruments so that you only have to look in one place for both heading information and VOR navigation information.


The course selector is the OBS from the VOR display; it shows the selected radial of 330°. The steering bar is the CDI from the VOR display. It shows the position of the aircraft with respect to the selected radial. The heading information is presented in a familiar manner, with the magnetic heading of the aircraft shown at the top of the display. The orange aircraft symbol shows the position of the aircraft with respect to the selected radial. In this example it’s easy to see that the airplane is southwest of the selected radial. The white triangle always points towards the VOR. So in this case, the VOR is behind us, and we are on a heading to intercept the 330° radial. The lubber line is a thin white line at the top of the display. We’ll see in the discussion below how very useful the lubber line is. With the HSI display, the pilot flies the aircraft towards the steering bar until the steering bar moves to the course selector. At that point you’re on the radial, so you turn the aircraft to the desired course. In a no-wind situation, this would be 330°.

Wind correction


Wind correction is done in a conventional manner, offsetting the heading as needed to keep the steering bar centered. But unlike the conventional DG display, the HSI makes it simple to determine the wind correction angle. If the steering bar drifts off center, simply turn the aircraft so as to place the tip of the white lubber line on the tip of the steering bar. As the steering bar re-centers, fly the aircraft much like you would fly a ground reference maneuver. Imagine the course selector is a road, and you are flying so as to maintain a ground track down that road by visual reference. Crab into the wind to maintain that ground track, and you have your wind correction.


Course Interception


One of the really great features of an HSI is how it allows you to smoothly intercept a given course, whether it’s a localizer, VOR or GPS. ATC puts you on a vector to intercept a given course, 030 degrees in the above graphic. Eventually the steering bar starts to move in towards the course selector. But when do you start to turn to the course? Depending on the sensitivity of the station (localizer versus VOR or GPS), do you wait until it is almost centered, or do you start turning earlier? The HSI takes the guesswork out of this situation. Once the steering bar starts to move inward, turn the plane so as to keep the lubber line on the tip of the steering bar, as shown on the right. As it moves towards the centerline, continue turning the plane so as to keep the lubber line centered on the tip of the steering bar, and you will have a smooth, effortless intercept of the course. Be forewarned, however, that in a strong crosswind coming from the direction of your intercept heading, this technique will lead you to the perfect wind correction heading. So if the steering bar stops moving, you will need to turn back into the wind in order to completely intercept the course.

Circling Approach


A circling approach, either at night or in poor visibility, presents a challenging situation to pilots of all experience levels. Experienced HSI users will set the Course Selector to the runway heading when the airport has come into view. Experience has shown that the safest path to the runway is the shortest path, and the HSI can provide a very helpful visualization as to where the runway is and where the pilot needs to go. You can either turn to enter a downwind, paralleling the course selector, or if you’re in position to enter directly into base leg, you can turn the aircraft to a heading that is perpendicular to the course selector.

You can even use this trick as an aid in taxiing when you’re at an unfamiliar airport – particularly where there is no helpful tower to provide progressive taxi instructions. Simply set the course selector to the desired runway, and it will at least get you started in the right direction. This little trick is very effective at night.


Quick Aid for NDB Approaches


Okay, so you may not ever have to actually fly an NDB approach, but in case every GPS satellite falls out of orbit and you actually have to fly one, the HSI can even help here. The trick is to set the course selector on the desired bearing to the station. When the ADF needle matches the course selector, both in orientation and relative number of degrees from the top of the card, 40°in this example, you are on course.

DME Arcs


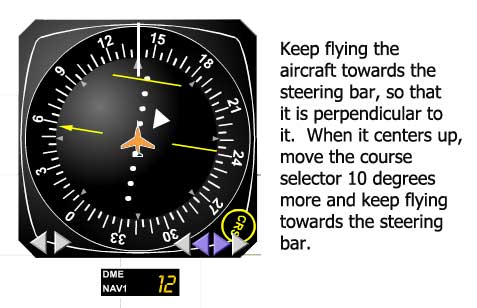
Admit it; there might still be a bit of mystery, even for experienced pilots, about DME arcs. Or maybe you just haven’t flown one in a long time. The HSI can be a pretty handy decoder ring for demystifying DME arcs. Say you are flying outbound on the 050° radial to intercept a 12-mile right-hand DME arc. Right-hand simply means you are to progress around the arc clockwise, or to put it in another perspective, your right wing is pointing at the VOR. So when do you start your turn onto the arc? The rule of thumb is ½ of 1% of your ground speed. So theoretically, if your ground speed is 130 knots, you would start your turn at ½ of 1% of 130, or ½ of 1.3, which would be about 0.6 miles. However, for anything less than about 150 knots ground speed, ½ mile works quite well. When you get to within ½ mile of the arc, turn the aircraft so that the orange aircraft symbol is perpendicular to the steering bar. Then move the course selector 10°, in the direction that puts the steering bar ahead of the aircraft symbol. To go around the arc, simply drive the aircraft perpendicularly towards the steering bar. When the steering bar centers, move it 10° more and continue the process.


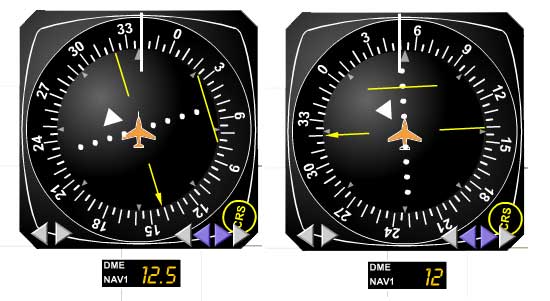
This even works if you are not tracking directly on a radial towards the arc. Suppose you have been given a heading to intercept a 12 mile left-hand DME arc. Let’s further assume you are intercepting the arc from the outside.


As you approach the 12.5 mile point, center the steering bar and turn the aircraft perpendicular to the steering bar. Since you are going around a left-hand arc, you want your left wing to point towards the VOR – left wing points in the same direction as the white triangle. Now move the course selector so the steering bar is in front of the aircraft symbol, and continue flying the arc as before. Now all you have to do is watch for the final course and be prepared to turn inbound. So there you have it – DME arcs demystified.

Holding


So all of the sudden, out of a not-so-clear-blue sky, you are given a hold. Yikes, and you don’t remember how it’s done. Okay, so you manage to sketch out the hold, as you are approaching Podunk VOR. But how do you get into it? Once again, the trusty HSI can help out. As you pass over the VOR (or waypoint), set the course selector to the inbound course. After passing over the station, turn so as to line up the miniature aircraft symbol to fly parallel to the course on the outbound leg. Fly for one minute and then turn inbound and intercept the course. It may not be the entry your flight instructor would prefer, but it will keep you within the confines of the protected space and get you into the hold.

Friday, September 08, 2006

Birthing Pains


So how does a modern sim like the new Elite arrive at its destination? The answer is in an incredible number of boxes. I had reached an agreement with R.C. Avionics at Anoka (KANE) to rent space for my new sim. ETA for the sim was late May. The arrival date slipped into early June, but soon one corner of the hangar was temporarily housing a large number of boxes. Looking at all those boxes, it was hard to imagine this could actually become a sim.

Once everything had arrived, I faced the challenge of trying to turn this pile of boxes into a modern sim. One of my former students came to the rescue. We started the assembly process on a Friday evening, and after four hours of hard work, the outlines were beginning to take shape. But there were still a lot questions about how to proceed with the cabling.

The next week one of the avionics techs volunteered to cable everything. Once that was done, we tried the basic smoke test – power it up and see if anything turned to carbon and started smoking. It seemed to work, but where was the Garmin 430 supposed to go? The only place that made any sense was in a center console. Elite support has been incredibly helpful, and they quickly verified the Garmin placement was correct.

But then problems surfaced. The sim is driven by two computers. One computer, acting as master, drives the simulation while a second slaved computer drives the visuals. The simulation computer had problems. Without any warning it would reboot itself. One of these uncommanded reboots occurred during the installation of a wireless mouse and keyboard. This left it so confused that it refused to recognize any mouse or keyboard in the Windows environment. The R.C. Avionics IT expert came by one evening and tried everything he could think of. It was all to no avail. The simulation computer had basically turned into a large rock.

I shipped the simulation computer back to Elite, where it was confirmed to definitely be broken. A new simulation computer was shipped out. Once it arrived and was installed into the simulation, I figured the problems were over. That proved not to be the case. The new one insisted on also doing uncommanded reboots.

The Elite support people were baffled. What could be causing it? So they got in touch with the manufacturer of the computer, who came up with the answer. The problem was being caused by the two 512m memory cards. I had specified a gig of memory, and it had been installed as two 512m cards. I was highly dubious that this could be the source of the problem but was willing to try anything at this point. Elite sent out a 1 gig memory card. We installed it and held our collective breath as the sim was powered up. It worked beautifully! No uncommanded reboots, no glitches; everything was working.

A large group of instructors, technicians, and students gathered around and watched as one of the senior instructors put the sim through its paces. The visuals are projected onto a large screen, and as of yet there was no screen. So a large off white piece of canvas was quickly hung up to serve as a temporary screen. We all oohed and ahhed as the demonstration proceeded without any hitches. The Garmin 430 worked beautifully, as did the KFC 150 autopilot and flight director. Even on the wrinkled canvas screen, the visuals were very clear.

Victory was declared, and it was now time to complete the installation. Another former student volunteered to help put the cockpit enclosure together. The enclosure assembled more easily than expected, and soon it was looking like a real sim. Now it was time to find a real screen. I blanched at the price of a large projection screen, but one of my students made an incredibly serendipitous discovery. He found a piece of white polywall at Home Depot. He promptly bought a 4’ x 8’ sheet and brought it up to see if it would work as a screen. The polywall sheet has one very smooth side and one slightly textured side. We put it up, and it worked beautifully. And it only cost $20, which sure beat paying several hundred dollars for a real projection screen.

The next step was getting the projector mounted. To date it had been sitting rather precariously on a stack of boxes. Another student made a platform to mount it near the ceiling behind the sim. It was all coming together. There were still a lot of details to be handled, but my dream of owning a sim was becoming reality.

With the help and support of a lot of people, the sim went operational on July 12th, when I gave my first lesson in it. It’s still a learning experience for me, as I explore the different capabilities of the software. But it is successful, and Sim Flite Minnesota is doing well.

Sunday, September 03, 2006

In the Beginning


Welcome to an online journal about the creation and running of Sim Flite Minnesota, a small enterprise devoted to sim and GPS training. I am a passionate advocate of sim training for pilots and for years utilized a Frasca 142 for instruction. However this spring the Frasca was sold, so I was forced to finally make a decision about my future as a flight instructor. My real interest lies in sim and GPS training, so I resigned from Knowlton Flight Instruction Services, where I had been chief flight instructor for several years, in order to set up my own company for sim training.

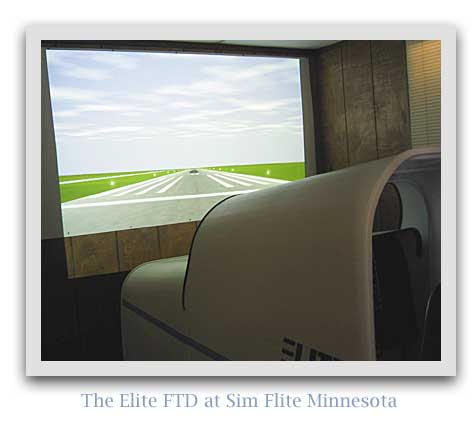
I had been researching various sims (technically FTDs - flight training devices) on a low level for quite some time, but the sale of the Frasca made it necessary for me to move forward with the purchase of a sim and the formation of an LLC to pursue sim and GPS training. The sim I chose is the new Elite, an FTD that is Elite’s answer to Frasca. It has the same FAA accreditation as Frasca, meaning it can be used for 20 hours of instrument training, as well as IPCs and approaches for currency.

Sim Flite Minnesota is located at the Anoka country airport (KANE), in the north metro area of Minneapolis. It has been quite an interesting experience to set up this company, and I will recount those growing pains. I had created another online journal, when I was chief flight instructor for Knowlton Flight, and many of those articles will eventually be uploaded to this new journal. But for now, welcome to my journal about the creation of Sim Flite Minnesota. It has been quite a journey.