Monday, October 30, 2006

Creating holding clearances


So there you are, trucking along in your trusty bug smasher (or trusty sim), tracking inbound on the 360° radial, when without warning your instructor sadistically says, “Devise a holding clearance from your present position that will require a parallel entry for a left-hand holding pattern.”

Many instrument students do very well figuring out holding entries in an intuitive fashion. However this approach tends to break down when you are on the dispensing end of a holding clearance rather than the receiving end. Although at first glance it may seem a bit daunting, once you have your secret decoding ring, it’s remarkably easy to do.

The secret decoding ring system works when the airplane is traveling to a VOR (or GPS waypoint). Let’s take the situation shown above, traveling towards the VOR. Remember when you were studying for your instrument rating and your instructor drew out the classic diagram for determining holding entries?


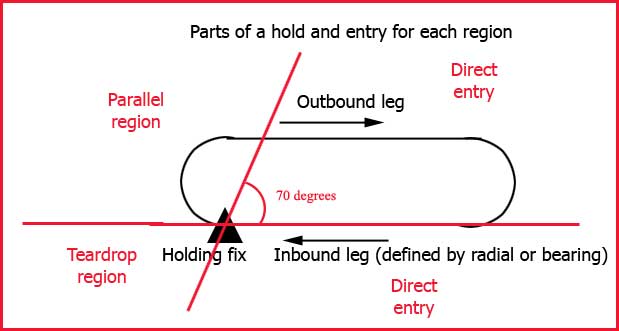
The trick in creating holding clearances is to use this same diagram and overlay it on the DG or HSI. Let’s say you are tracking inbound on the 360° radial as shown in the first figure, and you want to create a holding clearance that will force a teardrop entry for a standard (meaning right-hand) holding pattern. To do this, take the pattern formed by the red lines in the above figure and superimpose it on the DG or HSI, with the inbound leg being the radial on which you are tracking inbound.


Because it is a right-hand holding pattern, tilt the horizontal line up about 20° or so on the right-hand side of the DG or HSI. The radial on which you are tracking inbound forms the vertical line. Taken together, these two lines delineate the three regions for hold entries. The small pie-shaped section is for teardrop entries – any radial selected in this region will call for a teardrop entry. (Hint – remember “Tiny Tears”) The larger pie-shaped segment defines the parallel entry region. Any radial in this region will call for a parallel entry. Everything below the tilted line calls for a direct entry. So in this case, if you want to create a holding clearance that will force a teardrop entry for a right-hand pattern, any radial between about 190°and 240° will work very nicely. So the holding clearance could be

Hold southwest of VOR on the 210° radial right-hand turns EFC


If you want to create a holding clearance for a left-hand pattern, just tilt the left-side of the horizontal line up rather than the right side. Let’s say you want to create a holding clearance that will call for a parallel entry for a left-hand holding pattern. Again, superimpose the two lines on the DG or HSI, but this time since a left-hand pattern has been specified, tilt the left side of the line up about 20° or so, as shown below.


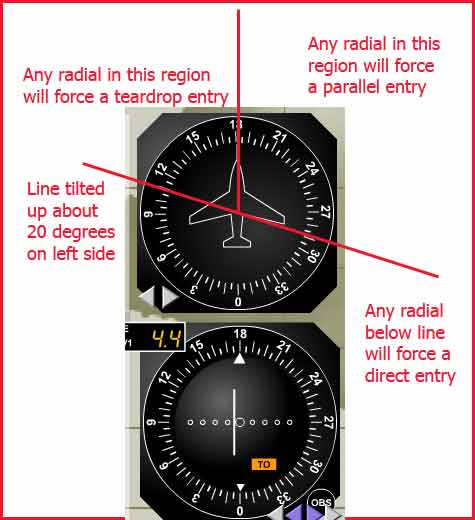
The 240° radial lies right in the middle of the parallel entry region. So a holding clearance could be:

Hold southwest of VOR on the 240° radial left-hand turns EFC

Creating hold clearances for your student is really a very simple matter once you know this little trick. Try out a few for yourself.

Direct entry for either left-hand or right-hand hold could be:

Hold northeast of VOR on the 030° radial EFC

Teardrop entry for left-hand hold could be:

Hold southeast of VOR on 150° radial left-hand turns EFC

Parallel entry for left-hand hold could be:

Hold southwest of VOR on 210° radial left-hand turns EFC


Parallel entry for right-hand hold could be:

Hold east of VOR on 090° radial right-hand turns EFC


And there you have it – the secret decoding ring for creating holding clearances for your student. And yes, it works equally well for teaching holding entries to your student. The only caveat is that you must be tracking towards the waypoint in order for this method to work.

Sunday, October 22, 2006

Avionics Troubleshooting

This avionics troubleshooting guide comes from R.C. Avionics. It is a great compilation of tips and guidance in troubleshooting avionics problems. R.C. Avionics suggests keeping a copy of this guide in the airplane.

General Troubleshooting
• Check the aircraft breaker or fuses. Reset only once.
• Is the electrical system properly charging?
• Could water have leaked onto the avionics?
• Could a connector be loose or wire broken from recent maintenance?
• Do you hear alternator or mag noise?
• Are any antennas missing, corroded, dirty, broken, oil coated, or delaminated?
• Is the problem intermittent?
• Could heat, cold, altitude or time be a factor?

Loran
• Has the correct triad been selected?
• Is manual triad mode selected?
• Verify the correct waypoint.
• Is there a NORAM of any outages?
• Are the signal and SNR levels adequate?
• Are you in a fringe coverage area?
• Is precipitation static a factor?
• Does it have the latest hardware/software updates?
• Check present position or nearest airport.
• Are there any warning or error messages?
• Is interference also affecting the ADF?
• Are you near a thunderstorm?
• Is the NAV selected to an ILS frequency locking out course deviation?

Transponder
• Is ATC receiving both Mode-A (squawk code) and Mode-C (altitude)?
• Has the problem occurred with more than one ATC facility?
• Is Mode-C inoperative or just reporting the wrong altitude?
• Does the reply light illuminate in radar coverage?
• Is the reply light dimmer turned down?
• Is it in the correct mode (stand-by/on/altitude)?
• Does it recycle (power off, then on, then wait 30 seconds)?
• Does turning off the DME resolve the problem?

Com/Audio Panel/Intercom
• Is the correct frequency active (not stand-by)?
• Are the audio switches set correctly?
• Is the auto mode being used?
• Is the same radio selected for transmit and receive?
• Is the volume turned down?
• Is a mic key stuck?
• Are both the headphone and speaker working?
• Does it both receive and transmit?
• Do you hear your voice in the headphone during transmit (sidetone)?
• Did ATC say they heard carrier only without voice?
• Is there background noise when in test mode (squelch off)?
• Try a different headset or microphone.
• Try emergency or isolation modes.
• Are the plugs or jacks dirty, corroded or loose?
• Do all crew and passenger headset locations have the same problem?
• Does another com act the same way?
• Is the oxygen mic switch in the proper position?

Autopilot
• Review operating procedures.
• Does it pass self-test on the ground?
• Does the auto trim work?
• Does the manual electric trim work?
• Does it engage?
• Can you overpower it on the ground?
• Do the controls lock when engaged?
• Could the cables be loose from maintenance?
• Is the aircraft out of trim?
• Is the horizon gyro precessing?
• Is the gyro vacuum within limits?
• Does it hold the wings level?
• Does it hold heading?
• Does it lose altitude in a turn?
• Does it porpoise?
• Does it respond in NAV mode?
• How does it respond on an ILS?

Radar
• Does it paint rain and ground clutter?
• Is the gain turned down?
• Is the brightness turned down?
• Does it test?
• Does it display wheel spokes?
• Does the tilt work?
• Are the images smeared?
• Does it lose targets within 40 miles?
• Is the radome damaged or delaminating or leaking?
• Is stabilization working?

DME
• Does it receive an ident code? (Listen for 60 seconds.)
• Is the remote channeling switch set?
• Is the display dimmed?
• Does the GS and TTS function? (Flying directly to/from but not over station.)
• Is the problem present on other frequencies?
• Does it test?
• Is there a NOTAM of any outages?

ADF
• Is it on the correct frequency?
• Is the unit in ADF mode?
• Does it point to the station?
• Does the needle move in test?
• Does the unit receive in ANT mode?
• Does the unit receive in ADF mode?
• Do all three frequency bands work – (200-399, 400-799, 800-1699)?
• Do you hear alternator or mag noise?
• Is the reception better on the ground with the engine(s) off?
• Are other radios interfering with the ADF?
• Are there thunderstorms in the area?
• Is there a NOTAM of any outages?

Lightning Detection
• Does it pass self test?
• Does it display aircraft electrical noise?
• Is heading orientation functioning?
• In a turn, are the dots all in the same relative direction?
• Is the brightness turned down?

GPS
• Verify the correct waypoint.
• Check present position or nearest airport.
• Are at least three satellites being tracked (VFR) or four satellites (IFR)?
• Is the satellite geometry poor?
• Are the satellite signal levels adequate?
• Has the unit been inactive for a few months?
• Is the hold or OBS mode selected?
• Is the NAV selected to an ILS frequency locking out course indication?
• Is there a NOTAM of any outages?
• Are there any warning or error messages?
• Does it have the latest hardware/software updates?

VOR/ILS
• Is the correct frequency active (not stand-by)?
• Does it receive the ident code?
• Do the needles or flags move at all?
• Can you select a reciprocal OBS course?
• Does the To/From indicator work?
• How many degrees off is the VOR?
• Does the NAV test (self or VOT)?
• Does it have 20° course width peg to peg?
• Do both NAV radios have the same problem?
• Does the localizer work but not the VOR?
• Are you close or far from the station?
• Does a change in engine rpm have an effect?
• Is the RNAV or PAR mode active?
• Is the Loran/GPS switched to the indicator?
• Is there a NOTAM of any outages?
• Is the problem present on different frequencies?
• Does VOR station position relative to the aircraft have an effect?

Marker Beacon
• Do the lamps illuminate over markers?
• Do lamps test?
• Are the lamps dimmed?
• Is problem resolved when high sensitivity is selected?
• Is the audio turned down or not selected?
• Are lights seen but tones not heard?
• Are the correct tones heard?

Monday, October 16, 2006

Let There Be Light


When it comes to lighting in the sim, it has been something of a Catch 22 situation. To really see the great graphics, the room needs to be fairly dark. However then reading an approach plate becomes nigh impossible. Some small lights on the sides have at least made approach plates visible, but the radio stack was still pretty much of a black hole.

One of the sim customers came up with the idea of utilizing rope lights to create sufficient ambient light to see the radio stack while still allowing the room to be dark enough to see a runway materializing out of the gloom. He brought in a piece of rope lighting that was long enough to go from one side of the cockpit enclosure, across the top, and down the other side. The lights are actually behind the pilot’s head, so they aren’t in the field of vision. He selected light green for the color, which happens to be a great color in a cockpit. The effect is great, and the visibility for the pilot is very good.

It was a great idea on his part, and I think it will really solve the problem of providing enough soft ambient light to see the radio stack and controls but not interfering with the graphics.

Sunday, October 08, 2006

Windows Strikes Again

Recently I flew with a longtime friend who wanted to do some approaches. He explained beforehand that he had been flying strictly VFR for several months and thought he might be a bit rusty. The flight confirmed the rust prediction. He wanted to make a trip to Rapid City, SD (KRAP), so decided to schedule a sim session.

He normally flies a Piper Dakota, a fixed-gear Cherokee with a 235 hp engine. I configured the sim for a fixed-gear C182, figuring this would be close in speeds and performance to the Dakota.

About 45 minutes into the sim session, strange things started happening. First symptom was a loss of power, followed by loss of vacuum, then electrical failure. I was baffled. I hadn’t specified any systems failures, and a check of the malfunctions page confirmed that everything was supposed to be working.

With apologies, I reconfigured the sim as a trusty C172, the most commonly used model in the sim. Again, about 20 minutes or so into the flight, the same set of symptoms occurred.

I was both perplexed and unhappy. This had been my friend’s first introduction to the sim, and it certainly did not live up to his expectations. I called Elite support and left a message detailing the problem.

Elite support called back in about an hour. Yes, they had seen the problem and knew what it was. It was not an Elite software bug, nor was it a hardware bug. Instead, it was a Windows problem.

Wonderful Windows XP had struck again. In its “father knows best” mode, Windows decided to put the USB hub into energy saving mode. I was directed to the proper spot to turn off the option to put the USB hub into energy saving mode.

So far it hasn’t happened again. Once again however I find that I really resent the hubris on the part of Windows to think that it knows what is best for my system.

Sunday, October 01, 2006

A Piece of the Magic


Periodically I check out fellow instructors in J’s plane. J. has a very nice fixed-gear Cessna Cardinal (C177). However a checkout in this plane reduces most instructors to feeling like a student pilot again. Remember how you felt the first time you tried to taxi an airplane? Well, you will relive that feeling on your first attempt to taxi J’s plane.

J. is one of the coolest guys I know. When he was 16 years old he fell off of a ladder and broke his neck. It left him in a wheelchair. But J. didn’t give up on life or his desire to learn how to fly. J. bought the Cardinal and had the left side fitted with hand controls. Although the right side has conventional controls, I have all instructors who fly with J. do the checkout in the left side, so they will understand how to fly a plane with hand controls and what J. is dealing with.

The hand controls hook on to the brake and rudder pedals with j-hooks. A bar comes up and rests on the pilot’s right leg. This bar has a knob to use when moving it. Move it to the 9 o’clock position and you have engaged left rudder. Moving it to the 3 o’clock position engages the right rudder. 12 o’clock engages both brakes, while 10:30 and 1:30 engage left brake + left rudder and right brake + right rudder respectively. You must learn to taxi and fly the plane with both feet flat on the floor. In the air it flies pretty conventionally, but taxi, take-off, and landings are very challenging.

When the first version of the hand control was installed in the Cardinal, it was not as functional as the current version, and I had an extremely difficult time learning to use it. I was the Anoka version of “Entertainment Today” for the tower. I will never (ever) forget the day I was going to taxi out to runway 27. I had to taxi north past the tower and then hang a hard right to go out to runway 27. When I started trying to make the turn to the right, I could not get the airplane to go all the way around to the desired direction. Unable to turn right, I decided I would do a 270-degree turn to the left. About a quarter of the way around, I came to a dead stop, unable to get the hand control to keep the airplane turning left. Completely frustrated, I decided to drop the hand control bar down on the floor and resort to using the rudders. However the j-hooks were still firmly attached to the rudder pedals and the bar was hitting the seat pedestals, preventing full use of the rudders. As a result I was unable to go in either direction. I was finally forced to shut the plane down and ask ground control if they would have a tug sent out for me. By this time the tower was in stitches, and I was completely embarrassed. I was definitely the talk of the airport for a couple of days.

One day when I was talking to J., I asked him why he was so determined to learn how to fly. He told me how he had always hung around airports, listening to the pilots talk. And then he said something that almost brought tears to my eyes. He said listening to the pilots talk, “flying was like magic, and I just wanted a piece of the magic for myself.” Go for it, J. – you’re an inspiration to everyone who knows you.