R. is a sim student who is working on getting his instrument proficiency back. He owns a lovely Piper Lance, and we met a few weeks ago when I did his flight review. Although he is instrument rated, he has not used it very much. I mentioned that he might be interested in Wings of Mercy Minnesota, a volunteer organization of pilots similar to Angel Flight. R. was interested and decided the sim was the perfect tool for regaining his instrument proficiency.
He is flying the sim configured as a Bonanza. We started with the basics, and it quickly became apparent that his initial training was good, although there was a bit of rust to be removed. He progressed through the basics, including partial panel work. The sim, incidentally, does very nice mag compass turns, which is quite satisfying after working in the Frasca. The only time the Frasca could do a mag compass turn correctly was if you were turning to a heading of either due east or due west. After going through the basics, all types of holding, and DME arcs, today it was time to start approaches.
R. and his wife are “snowbirds”, leaving Minnesota in mid-October for their home in Florida. Since we were starting on approaches today, I suggested he bring in plates for the airports close to their Florida home. So he brought in the GPS-4 approach for Winter Haven (KGIF), the GPS-27R approach for Bartow KBOW), and the ILS-5 for Lakeland (KLAL). Since the sim has a Garmin 430, as does his Lance, it was perfect.
It was a snap to load the USSE database, which included Florida. I positioned the plane at Lakeland, and he soon ready for takeoff. First came the GPS-4 into Winter Haven. He was vectored to go directly to the intermediate waypoint BEZDU. We did that approach twice, and then I vectored him for the GPS-27R at Bartow. Finally we finished up with the ILS-5 at Lakeland. The first ILS was vectors, and the second one included one turn around holding, which serves as the PT.
R. did a good job. But the thing that stands out in my mind was the ease of switching the Elite AATD from Minnesota to Florida. This was somewhat of a messy procedure in the Frasca. It is a far superior procedure in the Elite. And best of all, when R. and his wife depart for Florida in a couple of weeks, he will be fresh on the approaches at all three airports.
Friday, September 29, 2006
Sunday, September 24, 2006
Using an HSI
To many pilots, an HSI ranks high on the list of essential flight instruments, while others find it mystifying. So let’s try to demystify the HSI. HSI, as most of you know, stands for Horizontal Situation Indicator. However that definition by itself doesn’t offer much of a clue as to why pilots love it. So let’s examine an imaginary evolutionary history of the HSI.
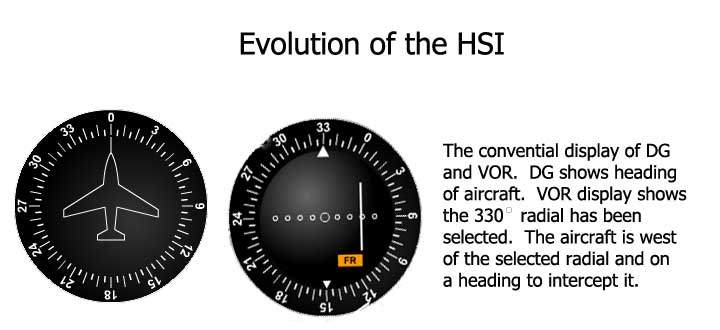
In the beginning there was the trusty DG (or heading indicator, if you prefer) and the VOR display. They were two separate and distinct instruments, with two separate and distinct functions.
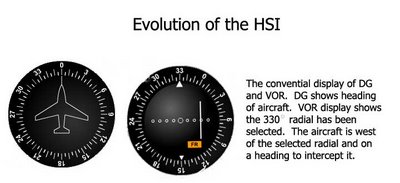
Most of us during our training learned to use the OBS knob on the VOR display to select our desired course, in this example the 330° radial. Then we would determine an appropriate intercept heading. The CDI shows the aircraft is west of the radial, so we fly towards the CDI. A heading of due north, as shown on our trusty DG, will work nicely. Sooner or later the CDI will start moving towards the center of the VOR display, at which point we guess as to how quickly to turn to a heading of 330°.
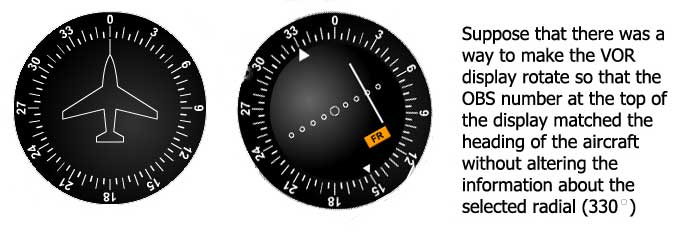
This all works very nicely, and it’s how the majority of us were trained. But we have to look at two different instruments and figure out if everything will work. Will we intercept that 330° radial? But suppose we could somehow magically rotate the VOR display so that it matched the aircraft heading.

This improves things, but you still have to look at two instruments. But now suppose you could merge those two instruments, so that the VOR display was superimposed on the DG. This is exactly what the HSI does – it merges the two instruments so that you only have to look in one place for both heading information and VOR navigation information.

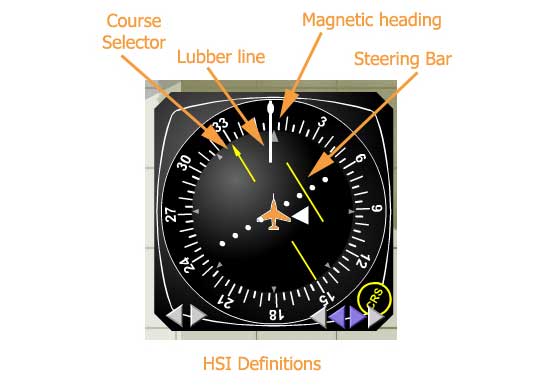
The course selector is the OBS from the VOR display; it shows the selected radial of 330°. The steering bar is the CDI from the VOR display. It shows the position of the aircraft with respect to the selected radial. The heading information is presented in a familiar manner, with the magnetic heading of the aircraft shown at the top of the display. The orange aircraft symbol shows the position of the aircraft with respect to the selected radial. In this example it’s easy to see that the airplane is southwest of the selected radial. The white triangle always points towards the VOR. So in this case, the VOR is behind us, and we are on a heading to intercept the 330° radial. The lubber line is a thin white line at the top of the display. We’ll see in the discussion below how very useful the lubber line is. With the HSI display, the pilot flies the aircraft towards the steering bar until the steering bar moves to the course selector. At that point you’re on the radial, so you turn the aircraft to the desired course. In a no-wind situation, this would be 330°.
Wind correction

Wind correction is done in a conventional manner, offsetting the heading as needed to keep the steering bar centered. But unlike the conventional DG display, the HSI makes it simple to determine the wind correction angle. If the steering bar drifts off center, simply turn the aircraft so as to place the tip of the white lubber line on the tip of the steering bar. As the steering bar re-centers, fly the aircraft much like you would fly a ground reference maneuver. Imagine the course selector is a road, and you are flying so as to maintain a ground track down that road by visual reference. Crab into the wind to maintain that ground track, and you have your wind correction.
Course Interception

One of the really great features of an HSI is how it allows you to smoothly intercept a given course, whether it’s a localizer, VOR or GPS. ATC puts you on a vector to intercept a given course, 030 degrees in the above graphic. Eventually the steering bar starts to move in towards the course selector. But when do you start to turn to the course? Depending on the sensitivity of the station (localizer versus VOR or GPS), do you wait until it is almost centered, or do you start turning earlier? The HSI takes the guesswork out of this situation. Once the steering bar starts to move inward, turn the plane so as to keep the lubber line on the tip of the steering bar, as shown on the right. As it moves towards the centerline, continue turning the plane so as to keep the lubber line centered on the tip of the steering bar, and you will have a smooth, effortless intercept of the course. Be forewarned, however, that in a strong crosswind coming from the direction of your intercept heading, this technique will lead you to the perfect wind correction heading. So if the steering bar stops moving, you will need to turn back into the wind in order to completely intercept the course.
Circling Approach

A circling approach, either at night or in poor visibility, presents a challenging situation to pilots of all experience levels. Experienced HSI users will set the Course Selector to the runway heading when the airport has come into view. Experience has shown that the safest path to the runway is the shortest path, and the HSI can provide a very helpful visualization as to where the runway is and where the pilot needs to go. You can either turn to enter a downwind, paralleling the course selector, or if you’re in position to enter directly into base leg, you can turn the aircraft to a heading that is perpendicular to the course selector.
You can even use this trick as an aid in taxiing when you’re at an unfamiliar airport – particularly where there is no helpful tower to provide progressive taxi instructions. Simply set the course selector to the desired runway, and it will at least get you started in the right direction. This little trick is very effective at night.
Quick Aid for NDB Approaches

Okay, so you may not ever have to actually fly an NDB approach, but in case every GPS satellite falls out of orbit and you actually have to fly one, the HSI can even help here. The trick is to set the course selector on the desired bearing to the station. When the ADF needle matches the course selector, both in orientation and relative number of degrees from the top of the card, 40°in this example, you are on course.
DME Arcs

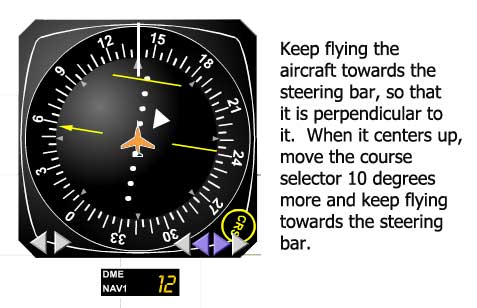
Admit it; there might still be a bit of mystery, even for experienced pilots, about DME arcs. Or maybe you just haven’t flown one in a long time. The HSI can be a pretty handy decoder ring for demystifying DME arcs. Say you are flying outbound on the 050° radial to intercept a 12-mile right-hand DME arc. Right-hand simply means you are to progress around the arc clockwise, or to put it in another perspective, your right wing is pointing at the VOR. So when do you start your turn onto the arc? The rule of thumb is ½ of 1% of your ground speed. So theoretically, if your ground speed is 130 knots, you would start your turn at ½ of 1% of 130, or ½ of 1.3, which would be about 0.6 miles. However, for anything less than about 150 knots ground speed, ½ mile works quite well. When you get to within ½ mile of the arc, turn the aircraft so that the orange aircraft symbol is perpendicular to the steering bar. Then move the course selector 10°, in the direction that puts the steering bar ahead of the aircraft symbol. To go around the arc, simply drive the aircraft perpendicularly towards the steering bar. When the steering bar centers, move it 10° more and continue the process.

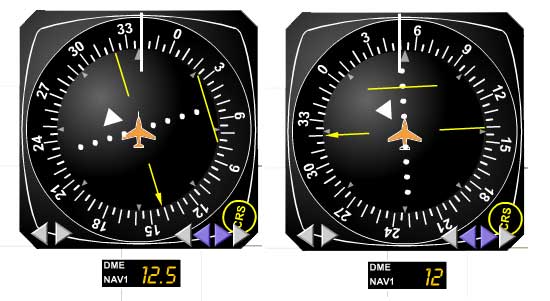
This even works if you are not tracking directly on a radial towards the arc. Suppose you have been given a heading to intercept a 12 mile left-hand DME arc. Let’s further assume you are intercepting the arc from the outside.
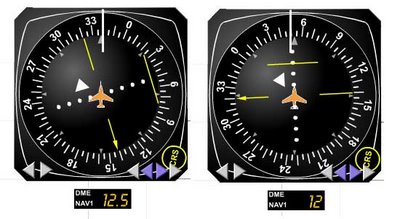
As you approach the 12.5 mile point, center the steering bar and turn the aircraft perpendicular to the steering bar. Since you are going around a left-hand arc, you want your left wing to point towards the VOR – left wing points in the same direction as the white triangle. Now move the course selector so the steering bar is in front of the aircraft symbol, and continue flying the arc as before. Now all you have to do is watch for the final course and be prepared to turn inbound. So there you have it – DME arcs demystified.
Holding

So all of the sudden, out of a not-so-clear-blue sky, you are given a hold. Yikes, and you don’t remember how it’s done. Okay, so you manage to sketch out the hold, as you are approaching Podunk VOR. But how do you get into it? Once again, the trusty HSI can help out. As you pass over the VOR (or waypoint), set the course selector to the inbound course. After passing over the station, turn so as to line up the miniature aircraft symbol to fly parallel to the course on the outbound leg. Fly for one minute and then turn inbound and intercept the course. It may not be the entry your flight instructor would prefer, but it will keep you within the confines of the protected space and get you into the hold.
In the beginning there was the trusty DG (or heading indicator, if you prefer) and the VOR display. They were two separate and distinct instruments, with two separate and distinct functions.
Most of us during our training learned to use the OBS knob on the VOR display to select our desired course, in this example the 330° radial. Then we would determine an appropriate intercept heading. The CDI shows the aircraft is west of the radial, so we fly towards the CDI. A heading of due north, as shown on our trusty DG, will work nicely. Sooner or later the CDI will start moving towards the center of the VOR display, at which point we guess as to how quickly to turn to a heading of 330°.
This all works very nicely, and it’s how the majority of us were trained. But we have to look at two different instruments and figure out if everything will work. Will we intercept that 330° radial? But suppose we could somehow magically rotate the VOR display so that it matched the aircraft heading.
This improves things, but you still have to look at two instruments. But now suppose you could merge those two instruments, so that the VOR display was superimposed on the DG. This is exactly what the HSI does – it merges the two instruments so that you only have to look in one place for both heading information and VOR navigation information.
The course selector is the OBS from the VOR display; it shows the selected radial of 330°. The steering bar is the CDI from the VOR display. It shows the position of the aircraft with respect to the selected radial. The heading information is presented in a familiar manner, with the magnetic heading of the aircraft shown at the top of the display. The orange aircraft symbol shows the position of the aircraft with respect to the selected radial. In this example it’s easy to see that the airplane is southwest of the selected radial. The white triangle always points towards the VOR. So in this case, the VOR is behind us, and we are on a heading to intercept the 330° radial. The lubber line is a thin white line at the top of the display. We’ll see in the discussion below how very useful the lubber line is. With the HSI display, the pilot flies the aircraft towards the steering bar until the steering bar moves to the course selector. At that point you’re on the radial, so you turn the aircraft to the desired course. In a no-wind situation, this would be 330°.
Wind correction

Wind correction is done in a conventional manner, offsetting the heading as needed to keep the steering bar centered. But unlike the conventional DG display, the HSI makes it simple to determine the wind correction angle. If the steering bar drifts off center, simply turn the aircraft so as to place the tip of the white lubber line on the tip of the steering bar. As the steering bar re-centers, fly the aircraft much like you would fly a ground reference maneuver. Imagine the course selector is a road, and you are flying so as to maintain a ground track down that road by visual reference. Crab into the wind to maintain that ground track, and you have your wind correction.
Course Interception

One of the really great features of an HSI is how it allows you to smoothly intercept a given course, whether it’s a localizer, VOR or GPS. ATC puts you on a vector to intercept a given course, 030 degrees in the above graphic. Eventually the steering bar starts to move in towards the course selector. But when do you start to turn to the course? Depending on the sensitivity of the station (localizer versus VOR or GPS), do you wait until it is almost centered, or do you start turning earlier? The HSI takes the guesswork out of this situation. Once the steering bar starts to move inward, turn the plane so as to keep the lubber line on the tip of the steering bar, as shown on the right. As it moves towards the centerline, continue turning the plane so as to keep the lubber line centered on the tip of the steering bar, and you will have a smooth, effortless intercept of the course. Be forewarned, however, that in a strong crosswind coming from the direction of your intercept heading, this technique will lead you to the perfect wind correction heading. So if the steering bar stops moving, you will need to turn back into the wind in order to completely intercept the course.
Circling Approach

A circling approach, either at night or in poor visibility, presents a challenging situation to pilots of all experience levels. Experienced HSI users will set the Course Selector to the runway heading when the airport has come into view. Experience has shown that the safest path to the runway is the shortest path, and the HSI can provide a very helpful visualization as to where the runway is and where the pilot needs to go. You can either turn to enter a downwind, paralleling the course selector, or if you’re in position to enter directly into base leg, you can turn the aircraft to a heading that is perpendicular to the course selector.
You can even use this trick as an aid in taxiing when you’re at an unfamiliar airport – particularly where there is no helpful tower to provide progressive taxi instructions. Simply set the course selector to the desired runway, and it will at least get you started in the right direction. This little trick is very effective at night.
Quick Aid for NDB Approaches

Okay, so you may not ever have to actually fly an NDB approach, but in case every GPS satellite falls out of orbit and you actually have to fly one, the HSI can even help here. The trick is to set the course selector on the desired bearing to the station. When the ADF needle matches the course selector, both in orientation and relative number of degrees from the top of the card, 40°in this example, you are on course.
DME Arcs

Admit it; there might still be a bit of mystery, even for experienced pilots, about DME arcs. Or maybe you just haven’t flown one in a long time. The HSI can be a pretty handy decoder ring for demystifying DME arcs. Say you are flying outbound on the 050° radial to intercept a 12-mile right-hand DME arc. Right-hand simply means you are to progress around the arc clockwise, or to put it in another perspective, your right wing is pointing at the VOR. So when do you start your turn onto the arc? The rule of thumb is ½ of 1% of your ground speed. So theoretically, if your ground speed is 130 knots, you would start your turn at ½ of 1% of 130, or ½ of 1.3, which would be about 0.6 miles. However, for anything less than about 150 knots ground speed, ½ mile works quite well. When you get to within ½ mile of the arc, turn the aircraft so that the orange aircraft symbol is perpendicular to the steering bar. Then move the course selector 10°, in the direction that puts the steering bar ahead of the aircraft symbol. To go around the arc, simply drive the aircraft perpendicularly towards the steering bar. When the steering bar centers, move it 10° more and continue the process.
This even works if you are not tracking directly on a radial towards the arc. Suppose you have been given a heading to intercept a 12 mile left-hand DME arc. Let’s further assume you are intercepting the arc from the outside.
As you approach the 12.5 mile point, center the steering bar and turn the aircraft perpendicular to the steering bar. Since you are going around a left-hand arc, you want your left wing to point towards the VOR – left wing points in the same direction as the white triangle. Now move the course selector so the steering bar is in front of the aircraft symbol, and continue flying the arc as before. Now all you have to do is watch for the final course and be prepared to turn inbound. So there you have it – DME arcs demystified.
Holding
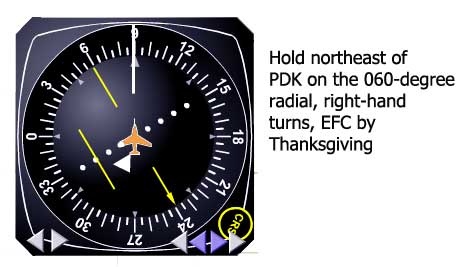
So all of the sudden, out of a not-so-clear-blue sky, you are given a hold. Yikes, and you don’t remember how it’s done. Okay, so you manage to sketch out the hold, as you are approaching Podunk VOR. But how do you get into it? Once again, the trusty HSI can help out. As you pass over the VOR (or waypoint), set the course selector to the inbound course. After passing over the station, turn so as to line up the miniature aircraft symbol to fly parallel to the course on the outbound leg. Fly for one minute and then turn inbound and intercept the course. It may not be the entry your flight instructor would prefer, but it will keep you within the confines of the protected space and get you into the hold.
Friday, September 08, 2006
Birthing Pains

So how does a modern sim like the new Elite arrive at its destination? The answer is in an incredible number of boxes. I had reached an agreement with R.C. Avionics at Anoka (KANE) to rent space for my new sim. ETA for the sim was late May. The arrival date slipped into early June, but soon one corner of the hangar was temporarily housing a large number of boxes. Looking at all those boxes, it was hard to imagine this could actually become a sim.
Once everything had arrived, I faced the challenge of trying to turn this pile of boxes into a modern sim. One of my former students came to the rescue. We started the assembly process on a Friday evening, and after four hours of hard work, the outlines were beginning to take shape. But there were still a lot questions about how to proceed with the cabling.
The next week one of the avionics techs volunteered to cable everything. Once that was done, we tried the basic smoke test – power it up and see if anything turned to carbon and started smoking. It seemed to work, but where was the Garmin 430 supposed to go? The only place that made any sense was in a center console. Elite support has been incredibly helpful, and they quickly verified the Garmin placement was correct.
But then problems surfaced. The sim is driven by two computers. One computer, acting as master, drives the simulation while a second slaved computer drives the visuals. The simulation computer had problems. Without any warning it would reboot itself. One of these uncommanded reboots occurred during the installation of a wireless mouse and keyboard. This left it so confused that it refused to recognize any mouse or keyboard in the Windows environment. The R.C. Avionics IT expert came by one evening and tried everything he could think of. It was all to no avail. The simulation computer had basically turned into a large rock.
I shipped the simulation computer back to Elite, where it was confirmed to definitely be broken. A new simulation computer was shipped out. Once it arrived and was installed into the simulation, I figured the problems were over. That proved not to be the case. The new one insisted on also doing uncommanded reboots.
The Elite support people were baffled. What could be causing it? So they got in touch with the manufacturer of the computer, who came up with the answer. The problem was being caused by the two 512m memory cards. I had specified a gig of memory, and it had been installed as two 512m cards. I was highly dubious that this could be the source of the problem but was willing to try anything at this point. Elite sent out a 1 gig memory card. We installed it and held our collective breath as the sim was powered up. It worked beautifully! No uncommanded reboots, no glitches; everything was working.
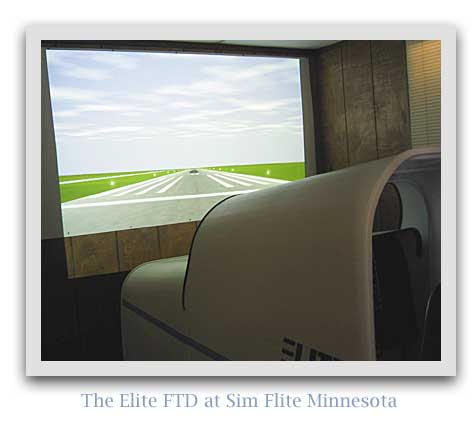
A large group of instructors, technicians, and students gathered around and watched as one of the senior instructors put the sim through its paces. The visuals are projected onto a large screen, and as of yet there was no screen. So a large off white piece of canvas was quickly hung up to serve as a temporary screen. We all oohed and ahhed as the demonstration proceeded without any hitches. The Garmin 430 worked beautifully, as did the KFC 150 autopilot and flight director. Even on the wrinkled canvas screen, the visuals were very clear.
Victory was declared, and it was now time to complete the installation. Another former student volunteered to help put the cockpit enclosure together. The enclosure assembled more easily than expected, and soon it was looking like a real sim. Now it was time to find a real screen. I blanched at the price of a large projection screen, but one of my students made an incredibly serendipitous discovery. He found a piece of white polywall at Home Depot. He promptly bought a 4’ x 8’ sheet and brought it up to see if it would work as a screen. The polywall sheet has one very smooth side and one slightly textured side. We put it up, and it worked beautifully. And it only cost $20, which sure beat paying several hundred dollars for a real projection screen.
The next step was getting the projector mounted. To date it had been sitting rather precariously on a stack of boxes. Another student made a platform to mount it near the ceiling behind the sim. It was all coming together. There were still a lot of details to be handled, but my dream of owning a sim was becoming reality.
With the help and support of a lot of people, the sim went operational on July 12th, when I gave my first lesson in it. It’s still a learning experience for me, as I explore the different capabilities of the software. But it is successful, and Sim Flite Minnesota is doing well.
Sunday, September 03, 2006
In the Beginning
Welcome to an online journal about the creation and running of Sim Flite
I had been researching various sims (technically FTDs - flight training devices) on a low level for quite some time, but the sale of the Frasca made it necessary for me to move forward with the purchase of a sim and the formation of an LLC to pursue sim and GPS training. The sim I chose is the new Elite, an FTD that is Elite’s answer to Frasca. It has the same FAA accreditation as Frasca, meaning it can be used for 20 hours of instrument training, as well as IPCs and approaches for currency.
Sim Flite
Subscribe to:
Comments (Atom)
