In the beginning there was the trusty DG (or heading indicator, if you prefer) and the VOR display. They were two separate and distinct instruments, with two separate and distinct functions.
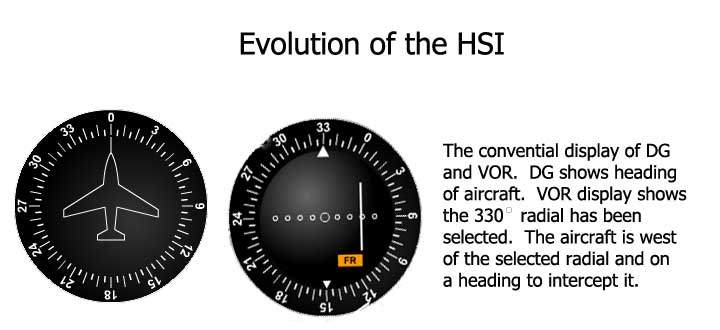
Most of us during our training learned to use the OBS knob on the VOR display to select our desired course, in this example the 330° radial. Then we would determine an appropriate intercept heading. The CDI shows the aircraft is west of the radial, so we fly towards the CDI. A heading of due north, as shown on our trusty DG, will work nicely. Sooner or later the CDI will start moving towards the center of the VOR display, at which point we guess as to how quickly to turn to a heading of 330°.
This all works very nicely, and it’s how the majority of us were trained. But we have to look at two different instruments and figure out if everything will work. Will we intercept that 330° radial? But suppose we could somehow magically rotate the VOR display so that it matched the aircraft heading.
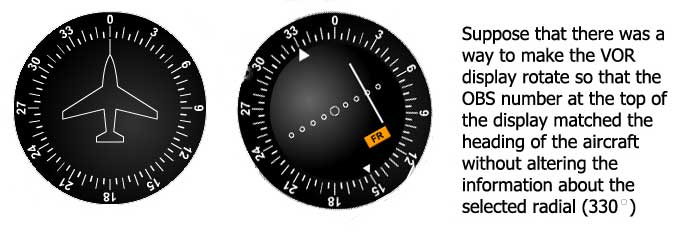
This improves things, but you still have to look at two instruments. But now suppose you could merge those two instruments, so that the VOR display was superimposed on the DG. This is exactly what the HSI does – it merges the two instruments so that you only have to look in one place for both heading information and VOR navigation information.
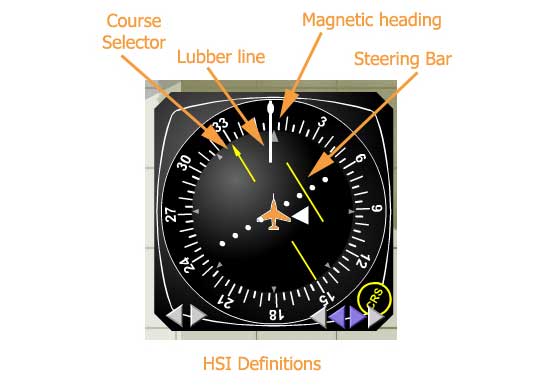
The course selector is the OBS from the VOR display; it shows the selected radial of 330°. The steering bar is the CDI from the VOR display. It shows the position of the aircraft with respect to the selected radial. The heading information is presented in a familiar manner, with the magnetic heading of the aircraft shown at the top of the display. The orange aircraft symbol shows the position of the aircraft with respect to the selected radial. In this example it’s easy to see that the airplane is southwest of the selected radial. The white triangle always points towards the VOR. So in this case, the VOR is behind us, and we are on a heading to intercept the 330° radial. The lubber line is a thin white line at the top of the display. We’ll see in the discussion below how very useful the lubber line is. With the HSI display, the pilot flies the aircraft towards the steering bar until the steering bar moves to the course selector. At that point you’re on the radial, so you turn the aircraft to the desired course. In a no-wind situation, this would be 330°.
Wind correction

Wind correction is done in a conventional manner, offsetting the heading as needed to keep the steering bar centered. But unlike the conventional DG display, the HSI makes it simple to determine the wind correction angle. If the steering bar drifts off center, simply turn the aircraft so as to place the tip of the white lubber line on the tip of the steering bar. As the steering bar re-centers, fly the aircraft much like you would fly a ground reference maneuver. Imagine the course selector is a road, and you are flying so as to maintain a ground track down that road by visual reference. Crab into the wind to maintain that ground track, and you have your wind correction.
Course Interception

One of the really great features of an HSI is how it allows you to smoothly intercept a given course, whether it’s a localizer, VOR or GPS. ATC puts you on a vector to intercept a given course, 030 degrees in the above graphic. Eventually the steering bar starts to move in towards the course selector. But when do you start to turn to the course? Depending on the sensitivity of the station (localizer versus VOR or GPS), do you wait until it is almost centered, or do you start turning earlier? The HSI takes the guesswork out of this situation. Once the steering bar starts to move inward, turn the plane so as to keep the lubber line on the tip of the steering bar, as shown on the right. As it moves towards the centerline, continue turning the plane so as to keep the lubber line centered on the tip of the steering bar, and you will have a smooth, effortless intercept of the course. Be forewarned, however, that in a strong crosswind coming from the direction of your intercept heading, this technique will lead you to the perfect wind correction heading. So if the steering bar stops moving, you will need to turn back into the wind in order to completely intercept the course.
Circling Approach

A circling approach, either at night or in poor visibility, presents a challenging situation to pilots of all experience levels. Experienced HSI users will set the Course Selector to the runway heading when the airport has come into view. Experience has shown that the safest path to the runway is the shortest path, and the HSI can provide a very helpful visualization as to where the runway is and where the pilot needs to go. You can either turn to enter a downwind, paralleling the course selector, or if you’re in position to enter directly into base leg, you can turn the aircraft to a heading that is perpendicular to the course selector.
You can even use this trick as an aid in taxiing when you’re at an unfamiliar airport – particularly where there is no helpful tower to provide progressive taxi instructions. Simply set the course selector to the desired runway, and it will at least get you started in the right direction. This little trick is very effective at night.
Quick Aid for NDB Approaches

Okay, so you may not ever have to actually fly an NDB approach, but in case every GPS satellite falls out of orbit and you actually have to fly one, the HSI can even help here. The trick is to set the course selector on the desired bearing to the station. When the ADF needle matches the course selector, both in orientation and relative number of degrees from the top of the card, 40°in this example, you are on course.
DME Arcs

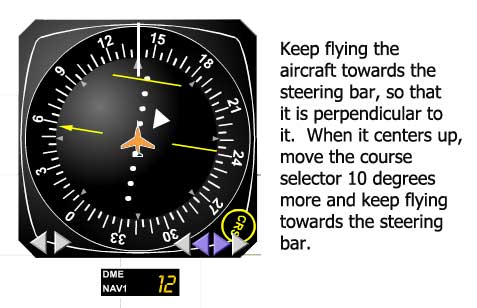
Admit it; there might still be a bit of mystery, even for experienced pilots, about DME arcs. Or maybe you just haven’t flown one in a long time. The HSI can be a pretty handy decoder ring for demystifying DME arcs. Say you are flying outbound on the 050° radial to intercept a 12-mile right-hand DME arc. Right-hand simply means you are to progress around the arc clockwise, or to put it in another perspective, your right wing is pointing at the VOR. So when do you start your turn onto the arc? The rule of thumb is ½ of 1% of your ground speed. So theoretically, if your ground speed is 130 knots, you would start your turn at ½ of 1% of 130, or ½ of 1.3, which would be about 0.6 miles. However, for anything less than about 150 knots ground speed, ½ mile works quite well. When you get to within ½ mile of the arc, turn the aircraft so that the orange aircraft symbol is perpendicular to the steering bar. Then move the course selector 10°, in the direction that puts the steering bar ahead of the aircraft symbol. To go around the arc, simply drive the aircraft perpendicularly towards the steering bar. When the steering bar centers, move it 10° more and continue the process.
This even works if you are not tracking directly on a radial towards the arc. Suppose you have been given a heading to intercept a 12 mile left-hand DME arc. Let’s further assume you are intercepting the arc from the outside.
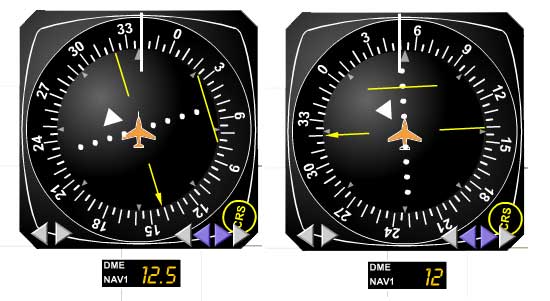
As you approach the 12.5 mile point, center the steering bar and turn the aircraft perpendicular to the steering bar. Since you are going around a left-hand arc, you want your left wing to point towards the VOR – left wing points in the same direction as the white triangle. Now move the course selector so the steering bar is in front of the aircraft symbol, and continue flying the arc as before. Now all you have to do is watch for the final course and be prepared to turn inbound. So there you have it – DME arcs demystified.
Holding
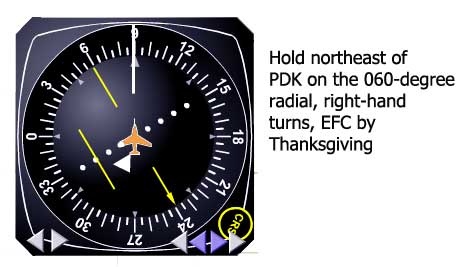
So all of the sudden, out of a not-so-clear-blue sky, you are given a hold. Yikes, and you don’t remember how it’s done. Okay, so you manage to sketch out the hold, as you are approaching Podunk VOR. But how do you get into it? Once again, the trusty HSI can help out. As you pass over the VOR (or waypoint), set the course selector to the inbound course. After passing over the station, turn so as to line up the miniature aircraft symbol to fly parallel to the course on the outbound leg. Fly for one minute and then turn inbound and intercept the course. It may not be the entry your flight instructor would prefer, but it will keep you within the confines of the protected space and get you into the hold.

8 comments:
I've flown 700 hrs and am IFR, but have always had just a DG with a heading bug in the two Mooney's we've owned and just ordered an Aspen unit to replace the DG and AI. I was very nervous about switching to the HSI presentation the Aspen provides because of all of the new capability it integrates, but this post definitely helps that anxiety and provides great refresher on the topics of DME arcs, holds, etc. Great article! Thank you!
I have a 6 month old IR done the usual way, DG and VOR. I am about to fly a twin with HSI and that was among the most clear and concise tutorial I found on the net. Thanks!
Great article! I have to do my IFR renewal and have forgotten the in's and out's of the HSI - i'm now confident again in its usage :)
Thank you for a clear article...very helpful. Mike
Best tutorial on the Internet.
This is really helpful. Thanks.
Best bets for soccer today - Sports Toto
Today, we're going to tell you a https://septcasino.com/review/merit-casino/ few kadangpintar key to goyangfc.com checking into soccer betting apps. of the most popular 사설 토토 사이트 soccer betting https://febcasino.com/review/merit-casino/ options and which ones will
I find it very helpful how this blog explains HSI functionality in an easy-to-understand way.
Post a Comment